In this era of technology, computers have become an essential part of our digital lives. We rely on computers for about everything. They are used in almost every sector- from agriculture to healthcare to defense.
With the increasing dependence on computers, it has become significant to protect every aspect of our digital lives. Nevertheless, many people neglect computer security until they experience an issue potentially affecting their security and privacy. In this article, we’ll cover a fundamental aspect of computer security- encrypting and password-protecting your folders. Read on to know how to lock folders in Windows 11 and Windows 10 using free software.
What is Encryption? What is it used for?
Cryptographic file encryption algorithms are commonly used to protect confidential information. The primary purpose of encryption is to prevent the contents of a file from being read by an unauthorized individual.
When you encrypt a file, encryption algorithm converts the original plain text into ciphertext. In simple words, encryption transforms the contents of a file which makes it unreadable to unauthorized individuals. The encrypted file will need to have a Decryption Key file or a valid password entered before it can be converted back to the readable plain text. The process of transforming encrypted data into readable text is called Decryption.
Lock Folders in Windows 11/ 10 Using Password
If you’re planning to let someone use your laptop or sending it for repair to a technician, they could gain access to your files, personal photos, emails, etc. Instead of spying over them like a secret intelligence service officer, you can password-protect your key folders.
Fortunately, you don’t have to spend your hard-earned money on buying anything. A free tool will do this job for you.
Method 1: Using PeaZip (Free)
Important: Skip over to Method 2-3 if you’re not looking for a Zip file-based password protection. PeaZip will not lock the folder itself, just create a password-protected Zip file.
PeaZip is a freeware, open-source file compression software. It is widely used to compress, decompress, encrypt, decrypt files and folders. It is also available as a portable edition. This means that you can use it without installation, and run on any PC straight from your USB stick or external HDD. Best of all, PeaZip is a cross-platform utility which you can use on multiple operating systems at home or office.
PeaZip has a neatly organized and straightforward interface. In the main UI, you’ll be able to explore the files, folders and drives on your computer. You’ll also see a treeview of special directories (such as Documents, Downloads, Desktop, Music, Pictures, etc.) on the left corner of your screen. PeaZip supports a vast number of file formats including .rar, .7z, .zip, .zipx, tar, .br, .ace, .zst, etc.
Using PeaZip, you can create an archive of your private folders and lock it with a password. PeaZip also supports encrypting your data with the industry-standard AES 256-bit encryption algorithm and Two-factor Authentication using a Key File.
Steps:
1. Download and install PeaZip on your computer.
2. Browse through the directories to select the folder you want to password-protect. (For example D:\OfficeFiles)
3. Click the “Add” icon on your toolbar.

4. Click on “Enter password/ key file” in the following screen:

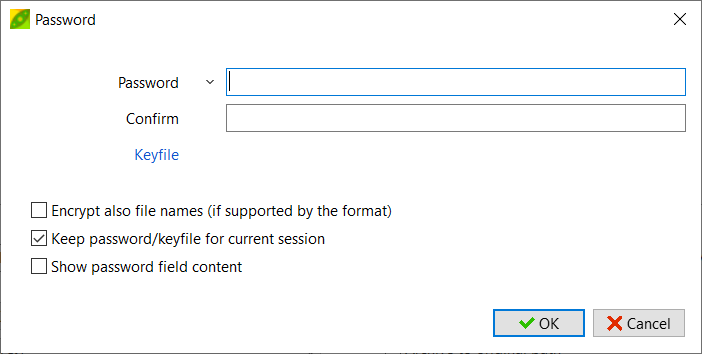
5. Type a strong password, and confirm it. Click on “OK”.
6. Type a name for your output file (for example “OfficeFiles.zip”)
7. You can leave other options unless you want to make specific changes.
8. Click on “OK” to create a password-protected archive.
9. Once an archive is created, you’ll be able to see it in the output directory.
Method 2: Using VeraCrypt (Free)
In contrast to PeaZip, VeraCrypt is a specialized software designed for data security. The good news: It is free, open-source and cross-platform.
VeraCrypt creates a Virtual Encrypted Storage Disk (known as Encrypted Container) which you can mount, unmount much like a real disk. It offers on-the-fly encryption with an added support of hardware-acceleration that makes it 4-8 times faster.
How does VeraCrypt work?
When you set up VeraCrypt, you create an Encrypted Container at your desired directory. For example, C:\Users\John\Documents\Secret.vc. There’s nothing anybody can do with this file unless they have VeraCrypt installed and your passphrase for authentication. As you select this file and unmount your Encrypted Container, it starts displaying all the private and confidential files in the File Explorer window. You can access and modify your files as you normally do. Once you’ve finished, unmount the container to hide it from others and disallow access to it.
Here’s how to lock folders in Windows 11/ 10 using VeraCrypt:
Steps:
Step 1: Create an Encrypted Container
- Download, install VeraCrypt.
- Click on “Create Volume”.
- Select the option “Create an encrypted file container”, and click on “Next”.
- Select “Standard VeraCrypt volume”, and click on “Next”.
- Click on “Select File” button.
- Choose your desired file name and directory for the encrypted container. Remember this file path, as you’ll need to it again. Click on “Save”.
- Select “Never save history” checkbox if you don’t want to keep a log of your access history. Click on “Next”.
- In the subsequent screen, select the “AES-256” encryption standard, and click “Next”.
- Specify a size for your encrypted container in terms of KB, MB, GB or TB, and then click “Next”. (Keep it 500 MB for the purpose of this example)
- Enter a strong password for your encrypted container, and confirm it. Click on “Next”. (Do not forget this password!)
- VeraCrypt will prompt you to start volume formatting to create your container. Click on “Format”, and give it some time to finish.
Step 2: Add Files to your Encrypted Container
- Select your desired drive letter for the encrypted container from the available drive letters list. (for example, H:\)
- Click on “Select File” and locate your Encrypted Container file, and click on “Open”.
- Click on “Mount”.
- Type your password, click on “OK”.
- Double-click the encrypted container from the list, and you’ll start seeing it in This PC much like other partitions on your hard disk.
- You can drag over your private files and folders to your new encrypted container. You can also view and update the existing files.
- Once you’re done, hide the files again by clicking “Demount”.
Method 3: Using Command Prompt
Another less-known way to lock folders in Windows 10 is to use Command Prompt.
Command Prompt is a powerful tool in Windows that helps you perform several administrative tasks and change your system settings. You can use CMD to protect your important documents and files from others. You can lock and unlock individual files, folders without needing to download any third-party software.
Important: Even though Command Prompt is a great tool, there are some risks associated with it. Mistyped commands can cause damage to your personal data, operating system, or installed programs. It is highly recommended that you re-check your commands before executing them.

Lock or Unlock Folders
1. Type “Command Prompt” in the Search Box.
2. Open the “Command Prompt” from the Search Results.
To lock a folder:
Syntax:
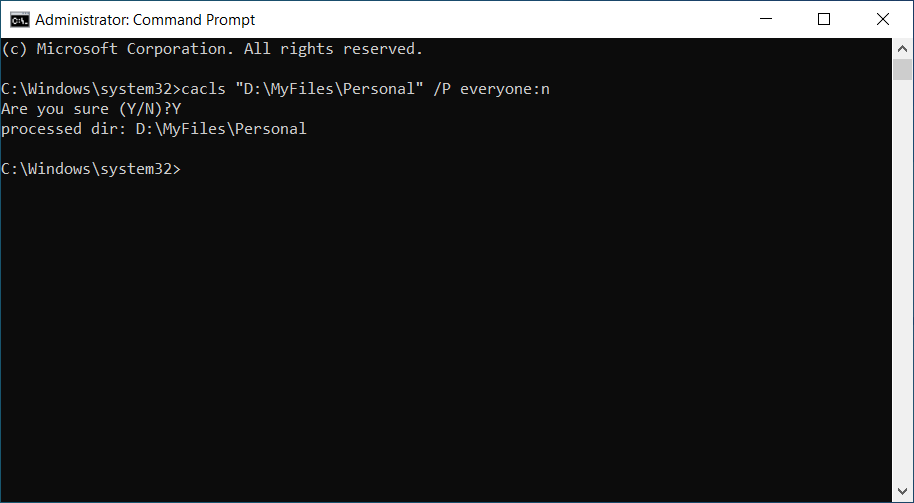
cacls “<Folder Path>” /P everyone:n
Example:
cacls “D:\MyFolder” /P everyone:n
When you’re asked to confirm, type “Y” (without quotes) and press Enter.
Note: Replace “D:\MyFolder” with the actual folder path.
To unlock a folder:
Syntax:
cacls “<Folder Path>” /P everyone:f
Example:
cacls “D:\MyFolder” /P everyone:f
Lock or Unlock Files
Similarly, you can use the following commands to lock or unlock individual files:
To lock a file:
Syntax:
cacls “<File Path>” everyone:n
Example:
cacls “D:\MyFile.pdf” /P everyone:n
To unlock a file:
Syntax:
cacls “<File Path>” everyone:f
Example:
cacls “D:\MyFile.pdf” /P everyone:f